Thursday, June 30, 2005
More of pinup's block
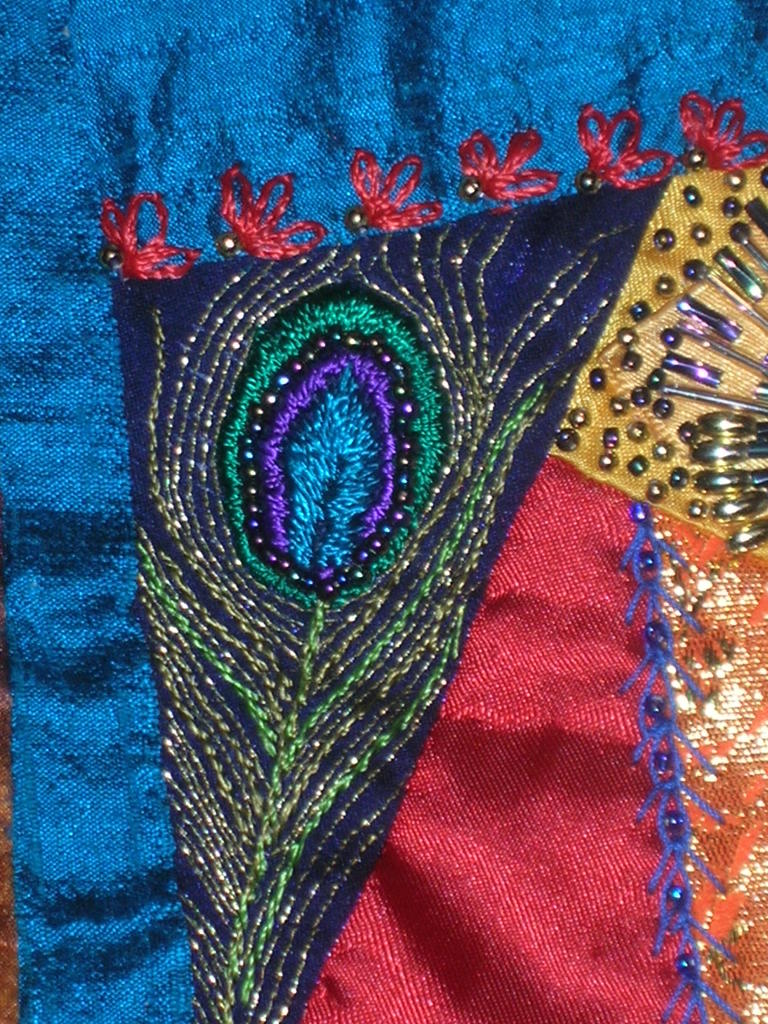
I have just finished this patch on pinup's block. When I received it, I immediately thought of peacock feathers, so here is the one I did, a bit stylised, but this is supposed to be creative. I used Marlitt threads for the eye of the feather and for some of the "feathery bits" (Can't remember what they are called) and in between I have used a metallic machine embroidery thread, all done with stem stitch. The eye of the feather is done in padded satin stitch and leaf satin stitch, with a single circle of bluish, greenish irridescent seed beads to add extra shine. The seam is embellished with lazy daisy in red, with gold beads.
I love the bold strong colours of this block.
Fairies at the bottom of Belle's garden
Here she is Belle - I hope you like her (if you can see her)- she's better in 'real' life :) I'm not sure how visible she is in the photo as I know she is there so I see her quite clearly. As she is stitched in metallic threads and these don't show up too well on the pc you will have to wait until she comes home for the true effect. Now to do a seam embellishment.

Sunday, June 26, 2005
BDE
With both Hope and Jacqui expressing an interest in Brazilian (dimensional) Embroidery I thought it was about time that I re-honed my skills. As I'm working on a "Dancing fan" for Maureen B from yet another CQ site I thought to add an extra dimension to a bunch of flowers.
First up I worked a lily and a bud in double cast on stitch,and then for a fill-in am adding some Lazy daisy with bullion.
Both (lots of) flowers have been worked in Lola weight thread,with Frost leaves and stems and Glory stamens.
I'll add a scan and "how to",later------------
First up I worked a lily and a bud in double cast on stitch,and then for a fill-in am adding some Lazy daisy with bullion.
Both (lots of) flowers have been worked in Lola weight thread,with Frost leaves and stems and Glory stamens.
I'll add a scan and "how to",later------------
Friday, June 24, 2005
Wednesday, June 22, 2005
Pinup's Block
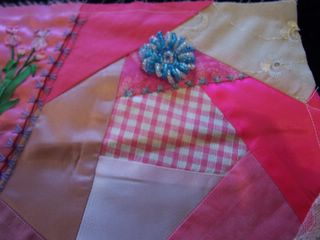
This is Geminista's bead work and seam embellishment on Pinup's block
This Pic shows Hope's and my work on Helen's block,which is now going down towards the "snow country" and Dianne

Posted by Hello
Posted by Hello
This is how Helen's block looked before it left for the PostOffice and then on to Dianne.There's SRE,BDE, beads and glass butterflies to tie in with Hope's butterfly seam treatment.
Posted by Hello

Posted by Hello
Monday, June 20, 2005
I Did it Again!
Hi all :)
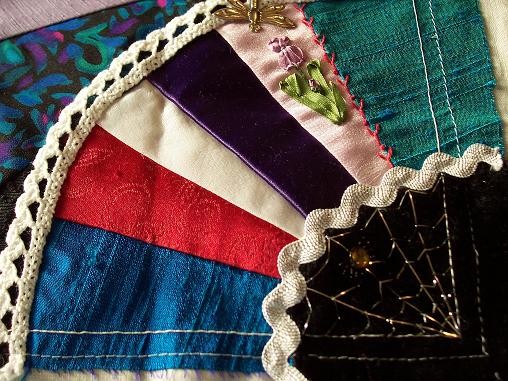
I hope no one objects to this but I thought I'd show you my new CQ block. I couldn't resist starting another new block using the same palette as my first which is going in the RR. I guess my 'bag' is going to be a quilt or wallhanging. If you'd like to see some close-up pictures of the seams please use the link above to visit my blog. Now I'm just waiting for some advice on threads and I will be doing a spider's web in one corner next.

I hope no one objects to this but I thought I'd show you my new CQ block. I couldn't resist starting another new block using the same palette as my first which is going in the RR. I guess my 'bag' is going to be a quilt or wallhanging. If you'd like to see some close-up pictures of the seams please use the link above to visit my blog. Now I'm just waiting for some advice on threads and I will be doing a spider's web in one corner next.
Wednesday, June 15, 2005
Elly's additions to Earthbelle's block

Love that spider Elly! If you want to see all the blocks and the work on them so far they are here
CQblocks
and here More CQBlocks
Evie's additions to Dianne/Joma's Block
Evie says of the patch,that
"TheSpider and web added using some silver/black thread that arrived in a squishy....not sure of it's brand and also not sure that it was 'perfect' for the web but it was worth a try. The spider is two glass beads that I knew one day would come in handy. I added the green braid to the seam....it also was in a squishy.....and I thought it tied in the green on other patches.

Posted by Hello
"TheSpider and web added using some silver/black thread that arrived in a squishy....not sure of it's brand and also not sure that it was 'perfect' for the web but it was worth a try. The spider is two glass beads that I knew one day would come in handy. I added the green braid to the seam....it also was in a squishy.....and I thought it tied in the green on other patches.
Posted by Hello
Maureen's fan :by Pinup!
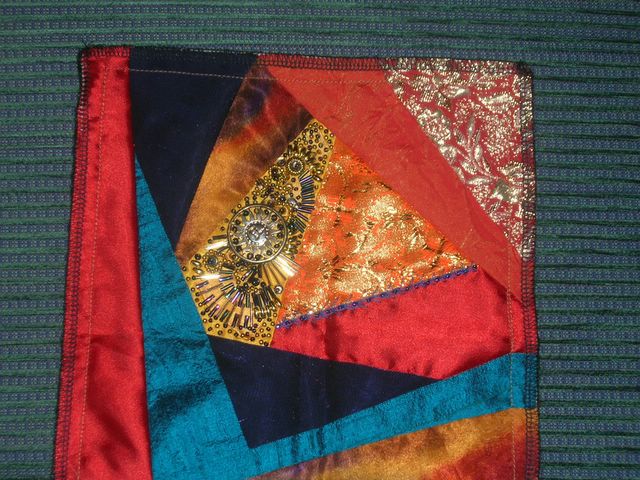
I have added three 'art doll' faces made from soft air drying clay painted with Lumiere paint. I used the same paint on the bow motif. Using the soft clay is brilliant because it can be stitched through. Lumiere paint is absolutely the best stuff....great range of colours and perfect to use on fabric....no medium needed. Around the faces I used a 'soup mix' of beads using colours that were in other patches of the block.

Posted by Hello
Posted by Hello
Sunday, June 12, 2005
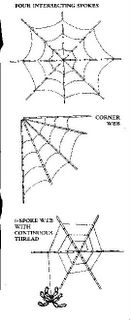
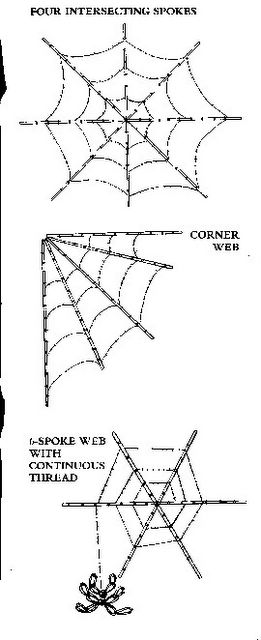
Forming a web: Here are three diagrams illustrating
1..A full circular type web.
2...A corner or fan shaped web;and 3: a 6 spoke web with continuous thread and a dangling spider
1..A full circular type web.
2...A corner or fan shaped web;and 3: a 6 spoke web with continuous thread and a dangling spider
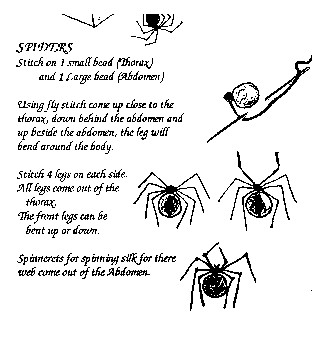
Spiders and webs
Spider webs,and spiders..........what is a crazy quilt without one?
They were added to Victorian crazy quilts as a symbol of good luck.
But,where do you place them?
I like to place my webs on a single plain fabric patch, and in a conspicuous spot.If your chosen patch is larger than you want your web to be,you could plan to lay your web in an embroidered vine or bush,just as you see them in Nature.
When stitching the web,use a good quality metallic thread;This will need to be couched,rather than stitched with, as metallic threads by their formation tend to unravel very easily.
Start by laying the spokes of the web: depending on whether it's a full circular type web or a corner(fan shape). see diagram for explanation.
Then using your fine metallic thread weave and couch it around the spokes in concentric circles;the web can then be dropped down for the spider to dangle from.
Remember that if you dangle the spider, the web is always to the tail end of the spider ,where their spinnerets are located under the abdomen.
Otherwise,position the spider on the web.
Now comes the fun part!
Choose two beads for the spider: I like a largeish black faceted bead for the abdomen,and a smaller bead for the head.If the spider is dangling from the web,stitch on the large abdomen bead first.,then the smaller one for the thorax/head.
Using a fly stitch come up close to centre of thorax,down behind the abdomen and UP beside the abdomen......the leg will bend around the body.
Stitch 4 legs each side of the body,with all coming from the thorax;the front legs can bend either up or down.
If you dont like the fly stitched legs,you can always try legs made of a couple of chain stitches,but you'll find that the number of legs need to be reduced--to fit them in.
Friday, June 10, 2005
Maureen's fan with iris,dragonfly,spider web and spider.The Iris and d/fly are from LynB and the spider web & spider from Jomo (I think)

Posted by Hello
Posted by Hello
Jomo's silk flowers
I'm not sure whether the silk flowers were done by jomo, or by LynB for jomo.Can "somebody" get back to me on this?
Posted by Hello

Posted by Hello
Evie's beaded roundel
The beaded roundel that Evie added to LynB's block.
I think that Evie said this was her first attempt at beading a roundel shape....when are you giving lessons Evie?
It's a little difficult to see,but it looks as though Lynette has added a clump of Iris on the left.
Posted by Hello
I think that Evie said this was her first attempt at beading a roundel shape....when are you giving lessons Evie?
It's a little difficult to see,but it looks as though Lynette has added a clump of Iris on the left.
Posted by Hello
LynB's block
LynB's block
 This is LynetteB's block when it arrived in New Zealand .Lyn added the embellishment in the upper left patch and seam before she sent it on its travels.
This is LynetteB's block when it arrived in New Zealand .Lyn added the embellishment in the upper left patch and seam before she sent it on its travels.Wednesday, June 08, 2005
Reference books
A discussion regarding the "best" reference books for Silk Ribbon Embroidery has reared its head.
Over the years,I've accumulated a "few"..........!
I started with the Milner Craft series publications featuring Jenny Bradford........I have 4 or 5 of hers and I still use them.
Then along came Merrilyn Heazlewood and her spring bulbs and gorgeous Fuschias
Express publications have also had a couple of books on Ribbon embroidery "Ribbon Embroidery"
Kangaroo Press has some books by Heather Joynes which cover both silk and satin ribbons.And in more recent years,Judith Baker Montano has always included some SRE in most of her books,particularly "Elegant Stitches" and "Floral stitches".
These days I tend to go mainly to the "Encyclopaedia of Ribbon Embroidery Borders" by Deanna Hall West,and J Marsha Michler's Ribbon embroidery transfers for "ideas" to translate my way.
Check out your local libraries before you buy anything.Most books will give you the basic stitches,and the hardest part of SRE is making the first stitch!
Make yourself a "scribble cloth" and PLAY with trying out the basic stitches,then TRY the various flowers,and if necessary write notes on the fabric alongside your stitching....or add the stitch samples and notes to your journal for future reference.
If you'd like me to add sketches of various stitches in future postings,please add a comment to that effect!
Mokuba Ribbon flowers
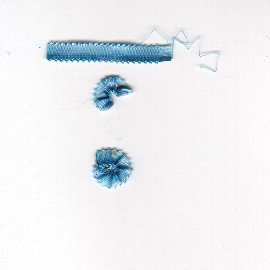
The stages of making a Mokuba picot edged ribbon flower
Posted by Hello
Scans without explanatory words aren't much use,I know---
On a recent Fan block (for Jan W) I had a spray of flowers .........some were silk ribbon embroidery,one or two others were constructed from picot edged polyester Mokuba ribbon,and this is how I tackle them:
The first step is to cut about 1.5 inches of a quarter inch ribbon.
Seal one end of the ribbon with a flame......a lit candle is the easiest, and you'll have a hard melted edge.
From the unburned end,unravel the horizontal threads and then when you've decided whether you want the darker or lighter side as flower centre,pull ona thread until it is gathered tightly.
Holding the gathered side in position(to make flower shape),burn this remaining raw edge.
Let one end overlap the other to form a small flower and then using a matching thread,sew the flower into position through the flower centre,adding one or more seed or delica beads as a centre,or fill centre with French knots.
This is the work that Hope did on Gemnista's block.I think she has already posted a description of what and how she did!

Posted by Hello
Posted by Hello
Monday, June 06, 2005
CQ Crazy
CQ Crazy
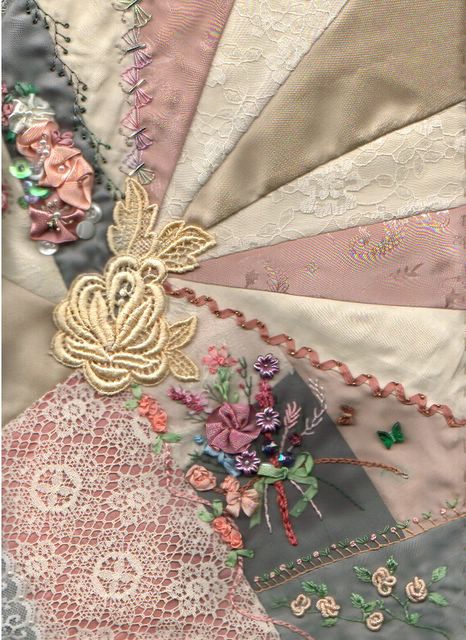
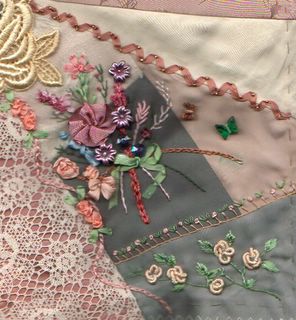
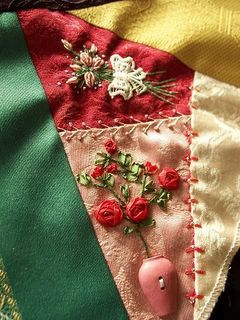
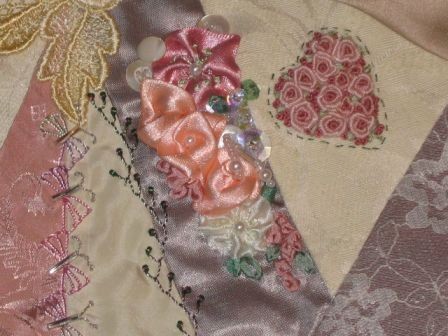
I have just finished my embellishments on Geminista's block and am very pleased with the results. I used Edmar threads to do the seam embellishments along with some twisted bugle beads and silver thread to make the butterflies, and the feather stitch is enhanced with Mill hill antique seed beads purple/dark green. The ribbon flower cluster is from satin ribbons, with Silk Ribbon for the french knots in the musky pink. Antique ?? mother of pearl buttond and a few milky seed beads, 3mm pearl beads and pearly tranluscent sequins fill in gaps. Leaves were done using detached chain stitch in 4mm hand dyed silk ribbon.
The rose heart on the second patch is done in DMC cottons in soft pinks and greens worked in bullion stitch.
A few non -sewing hints
On another group,I'm currently involved in a CQ Fan themed RR.
I happened to find some "brass" fan charms at a Scrapbooking shop,and after drilling holes for attaching them by,I decided that the gold look was too bright!
HOW was I going to dull or tarnish them ?
Not being particularly crafty,I thought I'd check with my online friends.The result?
The first hint from Gail:
If the charms are not real brass try dry painting on some black paint, then rubbing/dabbing off excess with a soft cloth or tissue. I use this technique when I am making brooches.
If they are real brass you may need to go the spray patina way as I am not sure if the paint technique will work with real brass.
The second from Relle:
you can buy a spray on patina that will dull it, or just leave them, in time they will discolour. You should be able to buy this at a craft shop or hardware.
Again from Gail,and I think AnnieW said the same:
A friend of mine used green paint as well to give it an old look.
Then Evie came up with:
Yes I have aged brass, applying some sort of flame to the surface usually does the trick depending on the quality of the 'brass'....flame works to tarnish most metals.
Soaking on Coca Cola can 'remove' almost any top surface off anything. I aged some silver once by placing in a bag with sulphur (just a couple of capsules that someone gave me).
Isn't it amazing how the things you would like to tarnish don't and the ones you don't want to do?
To cut to the chase----I found a gas cigarette lighter,applied it to the fan---
Voila! perfect!!
Thanks Evie.And yes,I will try out the other methods,WHEN I find out whether to use acrylic or enamel paints.
Saturday, June 04, 2005
Mixing embroidery with SRE
One of our newbies posed a question that may be bothering others out there:
"Is it the done thing to mix regular embroidery using regular cotton threads with silk ribbon embroidery?"
One thing I love about CQ is "No rules"!!!
Mix and match whatever threads,fabrics and silk ribbons that PLEASE you!
When I first started SRE I learnt to lay the stems and branches with "stem stitch" using stranded cotton;and when you think about it,Nature uses many and varied textures----a woody stem differs from a soft stem and a rose petal certainly has a different texture to a stem.
When I refer to my copy of"Encyclopaedia of Ribbon Embroidery Borders"by Deanna Hall West for inspiration,I find that virtually every border embellishment is based on a stranded cotton framework--------
So,mixing "regular embroidery" using stranded cotton threads with SRE???
GO FOR IT!
Maureen
Thursday, June 02, 2005
Elly's 'secret' motif
Hi everyone :) if you want to see the motif I added to Elly's heart block then please visit my blog via the link above - Elly - if you'd like a surprise please don't peek - you have been warned LOL
Wednesday, June 01, 2005
ATC How to start
Fiber Artist Trading Card
What is an Artist Trading Card (ATC)?
It's a 2.5" x 3.5" piece of art, made
to be exchanged with other artists, in our case mainly CQ;
This is the same size format as sports trading cards, They are a way to experiment with different techniques on a
really small scale, and to see what other artists are doing in their work.
Most of all they are fun to make and to collect!
See the links below for
more information and example of 'paper' ATC's, but remember we are doing
them in Fabrics/Fibers, beads, threads, embellishments etc.
They need to be towards the Quilt side of 'Fiber Art'
Here are some PAPER examples-
http://www.cedarseed.com/air/atc.html
http://www.tracyroos.com/ATC.htm
http://www.artchixstudio.com/gswap_Summer03.htm
And two other points you may query:
a..Do ATCs have a "back"?
b.. Is there cardboard in the "sandwich"?
and the answers from MaureenG:
"I make my trading cards on cotton batting or felt as a base, then add
plain felt backing and buttonhole or machine stitch together. If the
back felt is white or very light you can write on it how you made the
card and your name and date. Otherwise I cut a small piece of paper
and stick it to the back. Forgot to say you usually include name,
date, method of making with the card (sort of like a quilt label)."
ATCs
My interest in FibreATCs originally started with reading messages on another crazy quilting site.
At the time I shied away from investigating it further because I "didn't need another distraction in my life"!!
Then for our first national retreat for CQ held in Canberra last October it was suggested that we made/CQed our name tags-----and some of these were the same dimensions as the Fibre ATCs the others were playing with.
This year,for the proposed event at Nowra in November, it was suggested that we could make "sets" for friendship swapping..........and so it develops.
Maureen G of TangledThreads Blogspot has been making and swapping these fibre art forms and giving me advice---
http://maureengrantham.blogspot.com/
has some examples on her blog, and her works with many fields of fibre arts leaves me in awe.Check her site out!
The last couple of days I've been playing with "Very tiny pieces of CQ" namely pieces measuring 1 and 1/2 inches by 2 inches.(Silly me)
I've been endeavouring to piece these with silk----FUN!!
Silk keeps slip sliding away,slip,sliding....
I think the ATCs at the slightly larger size are more manageable.
Oh yes--------the ATCs! It's been suggested that backing them with white felt or even I guess,a calico gives you a backing on which you can write/print your name and details.
My next posting I'll make will be instructions for constructing these cards.......and yes,I think a swap/trade would be fun,but let's finish the RR first
ATCs
These little pieces of art have me fascinated and puzzled! Maureen mentioned them earlier in this blog with some photos and I have been looking at some more via the CQI group. Mainly I wonder "why?" and "what are they for?" These are probably silly questions as art is 'for' it's self and 'just because'.
My first idea was that they were a kind of fiber business card, but they don't contain any contact information although they might give you plenty of idea about the skill of the maker.
Secondly, I have also heard of fiber postcards being sent by ordinary (and air) mail between quilters. These are postcard size versions of the ATC I guess, but do have space for an address on them - permanent marker, printed label? - and somehow a stamp is added (all the descriptions seem rather vague about how!) and they are sent naked out into the postal system, to arrive franked and dogeared adding to their charm and originality.
I wonder if anyone has any more ideas about these art forms?
Could we do a postcard or ATC exchange after the RR is finished?
What do you think? I am captivated and I'm not sure why or what the attraction is but I do know I want to know more :)
![]()

